10 Top Tips for Mould Prevention When Growing Cannabis
.png)
As we approach springtime, the air outside will become warmer, and humidity will rise. This can be problematic for indoor growers who have to adjust. One downside of growing in high humidity is mould, a silent killer that can ruin an entire crop if left unchecked. In this article, I will explain what conditions cause cannabis mould and provide 10 tips to help you combat Botrytis and make sure that you never have to worry about another mouldy bud ever again!
How Do Cannabis Buds Become Mouldy?
Botrytis is the name given to this airborne pathogen that favours thick, dense buds in a grow room with high humidity and poor airflow. It is common for beginner-level growers to unintentionally cause their plants to flower under such environmental conditions, resulting in a mouldy crop.
In the same way, food in your fridge can become mouldy, and damp, cold walls can become mouldy; there needs to be the right environment for fungus to survive. There are good and bad types of mould. Whilst growers create their own IMO samples for Korean natural farming (KNF), the mould we are talking about today is unfriendly and can wipe out your flowering room, causing the maximum possible loss.
Mould can quickly spread from bud to bud and slowly but surely spread to the primary colas and even the secondary side branch colas. The worst-case scenario is when the buds mould from the inside out, meaning you only realise they are ruined when you are trimming and inspecting them.
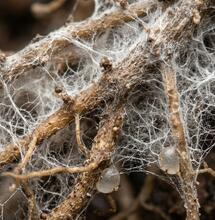
- Mouldy buds will have a grey or light brown colour
- The buds will have a candy floss and web texture
- The aroma of the buds will be earthy, musty and rotten
- Early stages of mould appear as brown or grey spots on buds
- Mould can cause stems to become soft and mushy
What Conditions Does Mould Require to Develop?
The advantages of growing cannabis indoors are that you get to control the growing environment. However, maintaining optimal growing temperatures and humidity for flowering is sometimes easier said than done during the colder winter months or when battling high summer temperatures.
- When the temperature is between 20 and 27 degrees Celsius
- Relative humidity levels above 55% will encourage mould to spread
- Minimal or no air flow around the flowering buds
- A spike in lights-on and lights-off temperatures
- Overcrowded grow rooms create optimal conditions
My Tips for Mould Prevention
I have had my fair share of mouldy crops in the past, and the reality is you have to wipe your vermouth off the crop, and make sure you never have to endure it again. Below are 11 tips to help prevent and stop mould in its tracks.
Tip #1 – Spotting Early Signs of Bud Rot and Pathogens
The earlier you can spot a potential mould issue, the better. Mould moves in silence, and unless you inspect the buds every day for the last 4 weeks, you can easily miss the signs and symptoms. I would recommend spending 5-10 minutes each day examining the buds in your grow room, especially the biggest and most sought-after colas.
Tip #2 – Choosing Genetics with High Mould Resistance
There will be cannabis seeds available from different breeders that have higher resistance to mould than others. Mould-resistant strains can be a lifesaver, especially if you tend to grow fist-sized colas or live in a climate that is warm and wet. Finding out which strains are better adapted to fighting mould can be a case of trial and error. Do your research online and see what other growers say in forums.
Tip #3 – Pruning Infected Buds with Sterile Tools
When you notice some buds have become mouldy and need to be cut away, use sharp scissors. It is crucial that you carefully remove any infected buds or cut away any mushy, infected stems connecting the buds. There will be cases where you have to cut away your best-looking buds, but do not try to save them for making extracts or hash, as they will be harmful if consumed.
Tip #4 – Sterilizing Equipment with Isopropyl Alcohol
Before and after using the scissors to cut away infected buds, wash your hands and the scissors with isopropyl alcohol to kill any mould spores and prevent the fungus from spreading to other plants. Using only water is not advised, and a bottle of isopropyl or hydrogen peroxide goes a long way when sterile and clinical are the names of the game.
Tip #5 – Preventing Overcrowding to Improve Airflow
Whilst having your grow room or tent packed from wall to wall with massive colas, controlling airflow and humidity levels may be much harder. Overcrowded plants, where the buds are starting to topple from weight and touch each other or lean on the wall, are most likely to become mouldy. When airflow is below par, overcrowded grow rooms are among the first to suffer from Botrytis. Make sure you spread your plants out evenly and do not let buds touch.
Tip #6 – Proper Disposal of Infected Cannabis Waste
After you have cut the mouldy buds off the flowering plants, tie them into a carrier bag and throw them into the rubbish bin. Cutting away buds and leaving them in a pile inside the grow room will only encourage airborne mould spores to spread back onto the buds. I cannot emphasise enough that mouldy buds, no matter how frosty or dank they appear, need to be thrown away and never used.
Tip #7 – Monitoring Humidity (RH) with a Digital Hygrometer
Second-guessing your temperature and humidity is one reason a beginner grower experiences a serious mould problem. When you know that humidity levels over 55% are the root cause of mouldy buds, being able to monitor the grow room with real-time data will be advantageous. I advise that you buy a digital hygrometer and keep it in your grow room. This will allow you to see 24 hours a day if your environment is on point or in the danger zone for mould and mildew.
Tip #8 – Optimizing Grow Light Distance to Reduce Heat Stress
Keeping your grow lights close to the plants during flowering can help produce big, fat and frosty buds, but it can also be a primary cause of heat stress. When temperatures are too high, humidity can rise, and mould can spread quickly. My tip is to raise your grow lights if you notice that the top colas are suffering from mould. I find keeping your lights 24-36 inches above the top of the canopy can make a big difference and help maintain cooler temperatures.
Tip #9 – Enhancing Canopy Air Circulation with Fans
Even with oscillating and wall fans in your grow room, airflow can still become restricted when there are so many buds. Giant colas and side branches can reduce air flow to other plants, meaning that the ones that are the furthest away from fresh air will always be the first plants to exhibit signs of mould. You can solve this problem by moving plants around to increase airflow or by adding another oscillating fan.
Tip #10 - Managing Irrigation During the Flushing Phase
One of the biggest mistakes growers make when flushing cannabis plants for the last 2 weeks is putting far too much water into the pots. Waterlogged, soggy soil holds moisture, raising humidity levels around the buds. There is no need to overwater pots, and my tip is to wait until the soil has dried out, give the plants the same amount of water as usual, and repeat the process over 2 weeks.
S
Stoney.Tark