8 Signs That Your Cannabis Plant is Doing Badly

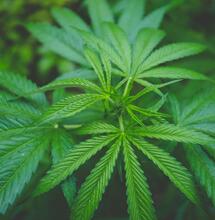
Cannabis plants are pretty resilient, but many things can go wrong when growing at home. Indications that your cannabis plant is doing badly manifest quickly. Crops can show signs of distress due to a lack of nutrients, overexposure to light and heat, or trimming done wrong. There could be a bug infestation, stunted growth because of root rot, and so on. Fortunately, cannabis is a responsive plant and can quickly recover if the core issue is identified and taken care of promptly and correctly. Below, we give a quick overview of some of the most common characteristics that indicate something is wrong with your cannabis plant.
Yellowing Leaves
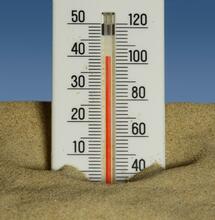
Most indications that things are off with your cannabis plant will initially show on the leaves. For example, yellow discolorations are usually the result of excess heat or excess light. Colorations can also be brownish. Leaves may turn hard and crisp to the touch, and this most usually happens when the lights are too close to the canopy or when the temperature in the grow room is too high.
It is crucial to keep the lights hoisted at the desired distance from the plants to prevent stress from overexposure to light and heat. The grow room must be adequately equipped with proper fans and ventilation, too.
Wilting Leaves
When leaves appear ill-looking and slightly off color, this is most likely a sign of nutrient deficiency. A lack of macronutrients, which include nitrogen, phosphorus, and potassium, primarily affects the leaves at the lower end of the plant. Leaves become discolored and after some time they die. Scarcity of micronutrients, such as calcium, iron, copper, boron, etc., primarily affects young leaves. These leaves may also start to lose their healthy green color and quickly become obsolete.
Avoid nutrient deficiency by dispensing sufficient amounts of both micro and macronutrients to your plant. The preferred combinations and dosage of nutrients may vary from strain to strain, so always get informed about the nutrient preferences when you get seeds from a plant you haven't grown before. Use a root wash to make sure the roots absorb nutrients properly, and regularly check for the pH levels in your nutrient-water solutions.
Brittle Leaves
Drying leaves that become hard on the touch, wilted and crispy indicate dehydration. When plants do not receive enough water, it will show on the leaves first. To confirm the diagnosis, also check the soil. If the soil is bone dry, it indicates that the underlying issue is lack of water.
Dehydration affects the metabolic processes in the plant. If you are unsure when it is time to water, perform a simple soil test with your finger. If you see that the upper layer of the container is dry (the first two inches), then it's definitely time to water. Consider using a drip irrigation system if you grow more plants and don't have the time to water regularly.

Drooping Leaves
Sagging leaves or curling downward is another sign that your cannabis plant is doing poorly. This indicates overwatering and can be more challenging to treat than dehydration. An excess of water stops the plant from receiving ample amounts of oxygen and nutrients from the soil. The lack of essential nutrients can also result in discolorations on the leaves, plus it affects the plant's immune system, making it more vulnerable to pests.
Overwatering can be a problem of both dispensing too much water or when watering your plants at too close time intervals. Because of that, it's good to mark down the dates on the calendar or in a diary on which days you dispense water and nutrients for your crops. Additionally, check on the drainage in your pots. Lack of drainage may result in stagnant water. The moisture on the soil is good when it appears airy and light. After watering the plant, the upper layer of the soil should not stay wet for more than a couple of days. When it does, the plant does need improving on drainage.
Spots on the Leaves
When the leaves on your cannabis plants begin to display unusual white or gray spottings, it usually means there is an ongoing insect or fungal infestation. Some infestations result from too much humidity in the growing environment, for example, powdery mildew. Overexposure to dump moist air doubles the chances for powdery mildew outbreaks and similar fungal infections. Fungi colonies thrive on wet soil, compost, and other plant material and can quickly spread on the entire plant. Applying a fungicide to the crops may be necessary in this case.
Spots on the leaves can also be yellow, indicating that aphids are feasting on your crops. These pesky little critters reproduce fast as they suck on the plant leaves juices. There are several natural insecticide solutions that you can use to get rid of them.
While organic fungicides and insecticides can help eliminate bugs that come after your cannabis cultivars, there are several things you can do to prevent infestations in the first place:
- Routinely clean your gardening tools, especially after working with diseased plants and plant debris. Wash over pruners and trowels with white vinegar or rubbing alcohol.
- Do not wear the same clothes you wear outside when you go inside your indoor grow room.
- Implement an organic pest control plan. For example, spray plants with neem oil once every week.
- Always isolate bug-affected crops from healthy ones to prevent the spreading of the disease.

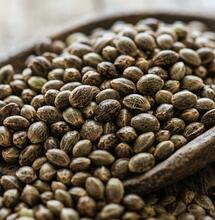
Seedlings Are Stretching
Abnormal stretching in the seedling phase is an indication of stress. Light deprivation is the most common reason seedlings stretch and eventually topple over. Cannabis seedlings are highly fragile and need much love and support to flourish and grow into beautiful budding plants.
As soon as seedlings emerge from their shells, providing them with the right type and amount of light is critical. One of the optimal lighting strategies for seedlings is exposure to around 16 hours of light daily at 375 lumens and 4000 lux. You can also expose sprouting seeds to fluorescent lights until growing the first four inches. Ensure that you keep the seedlings warm, especially if the room gets chilly once the lights are off. Place a small heater and monitor the room temperature.
Bud Rot
You've reached the phase where buds begin to appear, and you think, what could possibly go wrong now with my grows? Unfortunately, buds can be affected by several things, including bud rot. An excess of moisture and lack of air circulation may result in mold formation in the buds, after which they are no longer consumable.
Mold thrives in warm, damp, and humid environments. It is essential to lower humidity levels in the grow room when plants enter the flowering stage. This reduction should occur gradually to avoid another type of plant stress. Adequate air circulation is also crucial.
While still on the subject of buds, they can appear fragile and dry due to pests, or more precisely budworm infestation. Budworm rot can be accompanied by dying leaves near the affected site. You need to remove the worm and cut off any affected buds, then cleanse the plant from any remaining pest debris you detect to prevent further infestation. Using a magnifying glass to catch bugs and their trail of destruction is very useful for this problem.
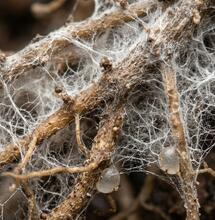
Root Rot
Slimy, brownish, and twisted roots with a foul smell indicate root rot, and it may mean that your plant is entering a terminal phase. The root system is directly affected by the water dispensed to the plant. Overwatering is the primary reason that can disturb the proper functioning of the roots.
Prompt action is needed to deal with root rot. If you detect this issue, transplant your plant to new soil and ensure proper aeration is in place immediately. Keep the plant container on a layer of clay pebbles and make sure it never sits in a saucer filled with pooling water.
Good luck growing!
S
Stephen Andrews