Substrates

One of the most commonly used substrates in the industry is soil. Potting soil, Light mix, full mix and grow mix are everywhere when you go shopping in your local shop. But what exactly do they contain and how are they used optimally?
Soil
Most soil mixes are a cocktail of various types of peat. These wet, spongy types of peat are formed by dead plants in swamps which have been preserved for a long time under moist, oxygen-poor conditions.
When these peat types are extracted from the ground, they are frozen through, in order to better absorb water later on. After this freezing process, the peat is dried, ground and sieved. But that’s not all; Peat types have a low PH value, usually around 4.0. This is so acidic that most plants cannot absorb nutrients at this PH value. The PH therefore has to be raised! During the development process of the soil mixes this is done by adding Calcium and a little Magnesium to the peat. This increases the PH to between 6.0 and 6.5. Finally, the soil producers add NPK fertilisers in order to provide the plants with their basic needs when first planted. The soil thereby has sufficient nutrition for the first 4 to 6 weeks.
If you are using soil (potting soil, light-/grow-/full mix) it is therefore not necessary to immediately start using liquid fertilisers during watering. Most potting soils and soil mixes are set to an EC starting value of 1.4 to 1.5.
It is important that soil substrates are not watered too fanatically. The structure of the soil is too solid to handle abundant water. If the soil remains too wet, the roots can suffocate.
With this substrate, it is a good idea to remember to give it water alternately three times with nutrition and once water without nutrition.
If possible, drop the closed bags of soil on the ground, or mix the soil with your hands. This will create an airier substrate with fewer chunks. The airier and finer the structure of the soil, the better it will work for you.
Growing on soil offers many advantages, but also has some disadvantages. We’ve listed these below.
Advantages:
- Growing on soil allows for more minor mistakes and is therefore ideal for beginners
- 100% organic and natural (with the exception of added inorganic fertilisers)
- Better flavour of the end product
- No liquid fertilisers need be added during the initial phase
Disadvantages:
- Heavier bags to carry
- Faster accumulation of fertiliser salts because the soil cannot be rinsed due to its dense structure
- Reuse is more difficult due to salt build-up
- Less airy than coconut and stone wool. Plants can form roots more easily in an airier substrate.
TIP! As you have just read, soil contains enough Calcium and Magnesium for the first 4 to 6 weeks. From the moment the plant starts to form its first flowers or fruit, it uses extra Calcium. This leads to a three-week peak. What happens when Calcium is extracted from the soil? The PH goes down! Given that you want to avoid this, the Calcium will need to be supplemented (e.g. Cal-Mag products).
Coconut
Coconut substrate is something that is increasingly used. It’s extremely popular in the United Kingdom. Demand outweighs supply. Coconut substrate is one of the most effective and economical substrates in the world. This has to do with two significant advantages: its airiness and moisture absorption capacity. Coconut substrate is very airy and can retain water for a longer period of time. Did you know, for example, that coconut can absorb 9 times its own volume in water (and nutrients) without being completely soaked? Unlike with soil substrate, it absorbs water immediately when dry. Moreover, the moisture distributes better through the fibres and coconut does not shrink when it dries out. Even then the coconut is able to retain its moisture and distribute it evenly under the surface. Plants therefore dry out less quickly. Due to its airiness and coarse structure, plants are able to root and breathe better. After all, the larger the root system, the better the plant grows and flowers.
[caption id="attachment_38657" align="alignnone" width="1920"] preparation coco peat for cultivation vegetable with drip irrigation system[/caption]
Coconut substrate consists of coconut fibre. Coconut fibre is a tough and stiff fibre that comes from the bark of coconuts. This fibre is located in the pulp layer between the hard core of the nut and the outer shell. This fibre was originally a waste product, which today has been transformed into a premium product for agriculture and horticulture. However, close attention and focus are required by the grower. The coconut fibre can’t be directly bagged. First, the fibres are steamed to eliminate all possible pathogens. Also, coconut fibres naturally contain an excessively high salt content (e.g. sodium, potassium and chlorine), which must be removed as much as possible. These salts can lead to growth stagnation, which will give plants a bad start, turn yellow to light green or have roots that become browner. This can be disastrous for the plants.
There are two methods by which the salts can be removed from the coconut fibre. The first method is by washing the fibres. This way, the salt content is reduced, but not as drastically as with the other method. This approach is called ‘Buffering’. The coconut is rinsed with calcium nitrate, whereby the salt content is drastically reduced to almost 0.
TIP: Therefore always buy coconut that has been buffered. This is usually indicated on the bag, but if you want to be completely certain, buy coconut with an RHP quality mark.
For cultivation, always use an A & B nutrition that is specifically tailored to coconut. After all, this nutrition always contains the ideal composition of fertiliser elements, adapted to the plant and the coconut substrate. During cultivation it is also useful to use a soil meter in order to measure the PH value and EC value of the substrate. If the PH drops and starts fluctuating, you can add extra Calcium/Magnesium. E.g. CalMag products. It is important to rinse the coconut substrate during the final week of the cycle. Only rinse with water combined with enzymes. This further reduces the salinity and starts a new cycle with a low salinity. Coconut substrate can be used for up to 5 years, provided it is rinsed well and replenished a bit from time to time. Coconut retains its airiness and moisture-retaining capacities for a very long time.
TIP: At the beginning of a cycle, only add A & B nutrition in combination with a root stimulator during the first 2 weeks. Don't start adding enzymes just yet! At that moment, the plant is busy building roots, while enzymes break down roots and convert them back into nutrients. Enzymes (degrading) and root stimulators (constructive) do not go well together. Opinions are mixed on this, but various studies have indicated significant improvements with the above method.
Given that coconut fibre is completely organic, it also increases the organic content of the soil. This in turn ensures a high cation exchange capacity (CEC). This means that ions from the nutrients are tightly bound and do not wash away. A coconut fibre is a long hollow cellulose fibre with a lot of lignin. This lignin makes and keeps the coconut strong.
Advantages:
- Prevents the growth of algae because the top layer of the coconut substrate is drier.
- The loose structure stimulates root development
- 100% organic
- Can be more frequently reused for a long time
- Promotes rapid growth and propagation of roots due to the airy structure of the substrate.
Disadvantages:
- Apart from coconut blocks, the bags are heavy
- If the coconut is not buffered, growth and flowering may stagnate
- Slightly more fluctuation in the PH value
- Requires more knowledge and experience from the grower
Stone wool
Stone wool is the most commonly used substrate in greenhouse horticulture. But what exactly is stone wool? Stone wool is a material spun from stone. This stone is a natural product that is created by volcanic eruptions. The name of this rock is basalt. By melting the basalt at 1400 degrees, a unique fibre structure is created, which is spun in a certain direction. This creates threads of stone wool, which are then joined together. The joined threads are subsequently formed into a mat with the aid of a binder in a curing oven.
These mats can be cut and made to measure in, for example: slabs, mapito, pre-growth blocks, plugs, etc. Due to the controlled manufacturing process, this growth medium is of a consistently high quality. The sterile production under extremely high temperature ensures cleanliness and is free of contaminants.
The stone wool structure is an ideal medium for plants to root. After all, it easily absorbs water and nutrients. In addition, it is also easy to flush out excess nutrients. With regard to growing on stone wool, it should however be noted that the grower requires a certain level of experience. More frequent measurements are needed of both the PH and the EC. The PH value increases more often and faster than with soil or coconut substrates.
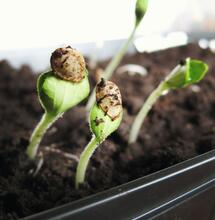
[caption id="attachment_38658" align="alignnone" width="1920"] a seedling barely visible in a rock wool cube[/caption]
The standard PH value of stone wool is 7.0. The ideal PH value for your plants in the substrate is 6.0. To achieve this value, the PH will have to be lowered. It is therefore advisable to add nutrients with a PH value of 5.2 to max. 5.4, so that the value in the substrate ultimately reaches 6.0. Make sure that the PH value of the nutrition is never lower than 5.0, as this will damage the fibres of the stone wool.
TIP: Regularly squeeze a bit of liquid from a piece of stone wool substrate and collect it in a container. Then place the PH and EC meter in the container and measure the values. It will quickly become clear whether the PH and EC values need to be adjusted.
The standard EC value of stone wool is practically 0. Fertilisers will therefore have to be added from the start of cultivation.
It is therefore a good idea to use an A & B nutrient throughout cultivation to ensure the plants have everything they need. For the first 2 weeks, use a root stimulator in addition to the A & B fertiliser. Enzymes can be added from the third week. These will break down the older roots and convert them into absorbable nutrients. During the final week, it is necessary to add only acidified water with enzymes. This way the stone wool substrate will be rinsed clean and will be able to be used again in a future cycle.
Finally, we have also listed a few advantages and disadvantages of stone wool substrate below.
Advantages:
- Airy structure that stimulates root development
- Sterile and hygienic
- Greater yields
- Reusable
Disadvantages
- Stone wool dries out faster than soil and coconut substrate
- Non-organic substrate
- Requires knowledge and skill


