Training Outdoor Plants - Growing Monsters

In this article I will explain the techniques that can be applied to your outdoor gardens, to turn a good grower great and how to grow plants, that are on par with the Californian grows. You will learn about various techniques such as L.S.T, super cropping, fimming, as well as the ideal time to perform each of these steps and many other useful tips that will ensure your grow will be as close to perfect as possible.
Plant Canopy
The canopy of the plant describes how the top and bottom parts are growing, so one way a grower can take control of the actual outcome of the harvest is by maximising the amount of flowering sites there can be. By now it is mid July and your plants will have been growing from April time or perhaps a few months later, either way your plant will have a thick trunk and strong woody side branches.
If you have left the plant to grow naturally and have not been tempted to see what techniques you can apply, then the plant will be as tall as possible and not as wide. The lower side branches may have grown upwards and you have lots of shoots and branches. This is the time now where you can execute my style of growing and create a top canopy like never before.
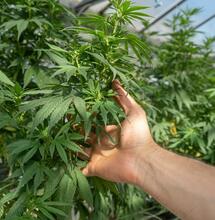
Getting Hands On With Your Plants
Tying down our side branches and top shoots is the first step, so getting hands on with your plants is key. You will want to basically pull all of the vertical shoots below themselves which will allow the plant to grow back and encourage smaller shoots to grow upwards. The reason this happens is because the hormone Auxin is no longer triggered as the top shoot is not in a vertical upright position.
If you are doing this with smaller plants then you must be delicate and work slowly. However if you are working with a mature plant that has multiple tops already, then this process can be done a little bit faster and with less resistance on the branches being manipulated. Before you start to tie anything down, a good rule of thumb is to slowly bend it back with your hands and feel how durable it actually is. Do you consider it softwood or hardwood so before any permanent pressure is applied? Ensure the branch in question will comply and not completely snap the top part of the shoot off.
Using Elastic Bands
I personally like to use elastic rubber bands when tying my plants down for several reasons. Some of those are they are cheap, very flexible and incase of an emergency the elastic can be bitten off in seconds. I work with fabric pots and creating a hole with a small screw driver takes no time at all and does not disturb the medium.
For the next stage you will need a handful of elastic bands, a pair of sterile scissors, clean fingers and thumbs and a small screwdriver to pierce the fabric pot or the standard plastic pots. Simply cut the elastic bands in half so you have a long string of elastic that can be stretched with no problem. Of course you will want large sized elastic bands for this and smaller elastic bands can dry in the sun quickly and become useless.
Tying The Tops
When you take the end of your selected branch, you will want to tie the elastic band around once creating a loose grip, whilst leaving enough slack and elastic band so you can then create a secondary knot to secure the first loop in place. The reason why this is the best way is to avoid any tied bands that are creating a severing effect. You should be able to then pull up and down on the elastic and see how durable your branch is. The whole point of this is to promote all of those smaller shoots inside the canopy, to grow upwards and become taller than the part that has been tied down. Once you have found the right amount of slack to create a horizontal branch, do not worry about the end not being totally sideways. Adjusting the extended branches over time is what makes this technique so effective.
By working with the slack of the band, find a point in your pot to make a hole the elastic band will fit through and be double tied back on itself. A good tip to remember is the lower down the pot you make the hole, the more of the branch is being exposed and will receive more light. I personally like to start off tying the band only an inch below the top of the pot, however as the plants grow longer and bushy, I then tie down the top of the extended shoot and this time make a hole so it is half way down the pot and really expose all of the original lower branch.
If you do this technique with 10 - 20 side branches the effect is an extremely bushy plant that will grow with a dense inner canopy of strong lower branches. The benefits that this technique has on the mainstem and side branches is very positive, as you see from the pictures, the plant responds and becomes chunky and thick in order to support itself and prepare for the heavy harvests ahead.
Once you have all of the branches tied down and the original top part of the plant can no longer be identified in the bush of curved stems and elastic bands, now is the time that we want to think about super cropping those tied down branches and really giving the plant some new support and thick green golf ball sized knuckles.
Super Cropping And Snapping Stems
The aim of the game with super cropping is to create a naturally healed broken stem. For those of you who freak out when the slightest thing happens to your plants may shy away at the benefits of breaking stems. When a person breaks a bone, it will be set in a cast until the calcium deposits grow back and form a new stronger bone. In effect this is what happens when a stem is put through the same trauma. As the shoots are all tied down and set in place with a nice tension, you will want to bend, twist and break the inner cell walls of the stem.
Usually a squeeze from your fingers will do the trick but a good twist and snap can force the new growth to be like a ball of hardwood. Either way once the break is in place growth repair hormones are released throughout the plant to allow it to heal faster and stronger, just like the scenario of the broken arm.
It does not take much pressure on some plants and some will be soft and easy to pop, whilst other mature ones may need more of a twist and pushing at a 45 degree angle. The fact that the branches are tied with tension, the breaks will heal quicker and ensure that they set in place.
Time To F.I.M
This is the last step that you need to do to make the tying down all worth it. You will want to get a clean pair of scissors and remove 70% of the top leaves. By doing this it actively slows down the main growing tip and will now focus its energy on the lower growth until the remaining 30% of the removed tip grows accordingly again with the rest of the plants. Incase you are wondering why it is called F.I.M, it means Flip I Missed which means the original intention was to totally remove the top leaves, creating two new shoots instead of one.
If you go around to the top of each tied down branch, delicately cut off the 70% or as close as you can to that amount of leaf matter. You are only slowing the speed of top growth down for around one week and this is when you will really see the inner smallest shoots take a dominant role inside the canopy.
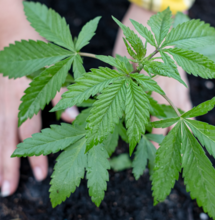
One Week Later
Within a few days you will already see the enormous impact that the tying down, snapping and fimming have had on the plants. How much you keep on tying down and extending further will determine the final size of the canopy to be either huge or enormous. Of course not everyone has the luxury of growing full scale plants outdoors and must be discreet and obey to their countries laws to some degree.
Two Weeks later
You should remove any new lower growth and star to focus on clearing out the lowest parts, so when you peek down into the lower parts of the stems and branches, it is relatively clear and you can see what has established as permanent hardwood and what can be rubbed away with your fingers.
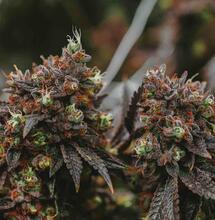
Once the smallest leaves have been cleaned away, you can now leave the plant to completely grow back and become a giant bush. It may be that you are close to the end of summer and the plant will soon begin to stretch and focus on heavy flower sets.
If you have been doing something similar from day 1, then you will have an epic plant that needs to be cleaned up quite a lot when flowering does commence. You are close now to the days becoming shorter and as result, the cannabis plant will begin to show pre flowers then stretch to as high as possible in following months. If you have followed the guide correctly, you will find that all of your stem joints are dense woody golf balls . Identifying which part of the plant is the top should be almost impossible.
Feeding Regime
One thing you will need to consider is that a plant that will produce a large quantity of fruit, despite what the plant is, they needs water and an abundance. My 25 litre felt pot drinks 10 litres of water every day. In the right conditions like Southern Europe, plants can grow enormous if treated to adequate levels of water.
Below is a list of my organic medium followed by what they are fed and how often: - Coco - Perlite - Worm Humus - Bat Guano Powder (8-22-2) - Blackstrap Molasses - Biobizz Fish Mix (6-2-4) - Remo Nutrients Sugar Candy (0-0-0) Each plant receives 5-10 litres depending of the stage of growth. Feeding at 5ml per litre and feeding plain water once every 3rd day. Once the medium is completely dry, then I will top feed until there is drip through, however because my plants are so thick and chunky, they are drinking like crazy and this is when you know you have a happy strong root system ready to pack on the pounds
Hints And Tips For Insect Control
A very good way to grow really big plants is to camouflage your grow space. If you have a clean colourful terrace or garden, then helicopters and neighbours may think again before taking a closer look. A great way to cover your plants from above is to have a tight thin rope that can accommodate several hanging baskets. Having one side of your garden dedicated to things such as tomatoes, chilis, peppers, strawberries and other low profile plants can allow you to get away with a lot more than bombing out a terrace and start sweating every time you hear a helicopter fly close.
Below is a list of all of the friendly plants that create a natural defense to your cannabis plants, against the threat of aphids, spider mites, thrips, flies, slugs and snails: Chervil: Slugs avoid this particular shrub and will do all they can to keep away from it. A great natural defense especially if you live in wet green areas prone to slugs and snails as many do in the UK. Basil: A natural repellent of thrips, flies, mosquitoes, snails and slugs by releasing a natural insecticide from the leaves.
This plant not only increases oil production of other plants, it is great to have indoors to stop unwanted insects also. Mint: A fresh smelling herb that will help mask your dankness with some minty freshness. Mint is also useful as it can be placed close to the plants with no problems. Mint can even be harvested and used in drinks and food also. Chamomile: If you have been plagued by whitefly this year living in Southern Europe, then invest in plenty of chamomile plants.
These sun flower friendly plants produce a terpene that whitefly dislike like very much. Keep these around your crop and you will notice how effective these plants are. Coriander: Anyone who has had problems this year with spider mites outdoors, should consider growing coriander. This plant is a natural repellent for spider mites and having this around your cannabis plants will make sure those pesky spider mites keep well away. Marigold: These bright orange circular flowers are great to deter aphids and mosquitoes.
Not only will these allow your garden to blend in with your bushy cannabis plants, they also add colours of orange and red to your garden.
Hints And Tips For Temperature Control
A big problem that many growers also experience during the long hot summer months is excess heat stress. This week in Spain, there was a weather warning as temperatures were expected to exceed 40 degrees celsius and above. A good way to combat this problem is to keep your plants shaded during the hottest parts of the day and in the long term, your plants will be in much better shape than left to handle such extreme heat. A good way to shade your plants is to either move the plants in accordance with the sun and find a shade spot during 12-3, or create a cover that will keep all the light and heat out.
Many growers often say that spraying plants when it is hot burns them but keeping them in a shade spot and spraying them is very refreshing for the plants and allows them to work on transpiration. Using white tiles on the floor keeps the roots happily warm without touching any floors that are too hot to even walk on. July until August can be devastatingly hot and an increase in temperatures can really wipe crops out. Keeping on top of how much water your plant is taking from the medium or sucking from the air is imperative, especially after such a distance into the growing season.
Conclusion
Good luck training up your outdoor monsters and scoring the biggest yields you have ever had. Big tall plants do not necessarily mean big yields. Get used to growing with many other plants as mentioned above and discover that being subtle is being safe. Peace Out!
By Stoney Tark
S
Soft Secrets