The Importance of Drying and Curing
A smoother smoke, a more even burn and an increase in potency: sounds too good to be true, right? But, a little bit of hard work after you harvest carries big rewards. Soft Secrets takes a quick look at curing....
Hanging It Out To Dry
So, you have spent the last three months tending to your girls, lavishing them with tender loving care and the big day has finally arrived... its harvest time and your smoke will be ready within the next week. But hang on there, remember the whole reason that you grew your own in the first place was to have a stash of the finest weed possible? At harvest time your work is only 75% done. To get the ultimate from your weed, put in that little bit of extra effort and dry and cure it properly.
Commercially grown crops are usually harvested early, cut, trimmed and dried for about a week, often in a warm environment, before being sold. The idea of a commercial grow is to get your cash turned around in the quickest amount of time - fair enough. However, quick dried bud can taste harsh and have low potency. We've all been there, you buy a bag of weed that smells good and feels dry on the outside, but when you break the bud open it is still moist on the inside and the smoke is harsh and can taste a little like cut grass; this taste is the chlorophyll still present in the cells of the plant.
So why cure? The process of curing promotes the slow decarboxilation of oxygen molecules from the THC present in the bud, this will increase the psychoactive properties, making the weed more potent. The curing process also means that moisture levels will be even across the entire bud, giving you a much smoother smoke and a more even burn. When you grow your own, you want to get the maximum from your crop. You owe it to yourself to cure those buds!
To prove the point, I tried a little experiment with some recently harvested White Widow (from Pyramid Seeds) and a good friend of mine - Original G - here is the smoke report in his own words...
The Ideal Curing Jar
“So after harvesting we were desperate for a try of the lovely green that had been produced and we dipped in way before it had time to dry...this was a big mistake!! It still smelt way too fresh, almost like cut grass, the weed aroma was hardly there at all and, although it looked great, it was slimy and wet inside. It had to be trimmed with scissors to get it small enough to roll and the smoke was pretty terrible, sour and not very strong it was really a waste of skunk!! Be aware that force drying or what we now unaffectionatley call ‘radiator weed' is no better, in fact it was a lot worse!!
After 7 days of hanging and drying the transformation is incredible, it's dry but sticky inside, the crystals are glistening and it smells delicious. The smoke is really good; easier to crumble than before, although does stick in the grinder a little. It tastes much stronger and the lovely sweet taste of widow is in full force. Plus it delivered a really nice high, not to heavy and a little bit lively which is good if you still want to function after a chong!!
After the dry, it had a couple of weeks curing in jars and it's transformed again. It's really pungent now and totally dry, the crystals are glistening away and it crumbles between the fingers perfectly. In fact I'm sure if all weed was left this long you'd have twice as much to smoke, although it's gone down in weight the dryness means you use less than before while building. It tastes as good as it smells and is stronger than before, it still gives a lovely high, a really good smoke...if only all weed was left this long!!„
Proof, if proof was needed!
The first step to the smoothest smoke is to get the drying process right so you should choose your drying area carefully. Ideally you want somewhere that is dark, cool - around 18°c - and has around 50% humidity. If your drying area is too cold, then drying will take forever. If it is too hot then you run the risk of drying your harvest too quickly, which will make it taste harsh - exactly what you don't want!
The grow room is a great option for drying as it will be dark and well sealed, it will also have the benefit of having a carbon filter attached to stop any unwanted smells escaping. The drying and hanging process will take around two to three weeks, so if you can do without the grow room for that long, then do it.
A Lovely Cured Bud, Ready For The Grinder
When you have harvested your plants, first remove any fan leaves that have no visible trichomes on them, then take the plants by the stem and hang them upside down using string or fishing line attached to clothes pegs, screws or nails. Make sure they don't touch each other as this can cause mould. You can now manicure your buds by roughly cutting off the small to medium sized leaves; these should be saved for bubble hash.
Leave to hang for two to three weeks. You are now ready to cure...
One tried and tested way to start the curing process is the paper bag method. While your harvest is hanging to dry, get yourself down to the shops and pick up some brown paper bags - like the ones you get fruit and veg in from the greengrocer - the larger ones if possible, around the same size as an A4 piece of paper. A cash and carry is a good place to try, as you can normally pick them up in reams of 100 for very little money.
Put a handful of bud into each bag and fold down the top, the idea is that the buds will ‘sweat' out the moisture contained in the centre of them and this will be absorbed by the paper bag. Open the bags twice a day and shake the buds around to let any moisture out of the bag.
Once the buds have been in the paper bags for three or four days, you can check if they are completely dry by placing the paper bags in plastic zip lock bags and sealing them. Leave them in the zip lock bags for a couple of days. If you can see moisture on the inside of the plastic, or the buds feel moist when you squeeze them, then they are not ready and should be removed from the zip lock bags and left in the brown paper bags for another two or three more days.
The final test to see if the buds are completely dry is to take one of the larger pieces and bend it, the stem within the bud should snap. If the stem bends without snapping, then there is still some moisture left and you should continue with the paper bags for a final two or three days.
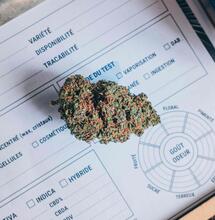
When you are confident that the buds are dry, then they can be placed into preserving jars - the kind with a rubber seal and latch on them - and sealed. The main factors in THC degradation are heat, light, oxygen and water. So the jars should be filled to the brim and kept in a cool, dark place where they are also safe - not the kitchen cupboard!
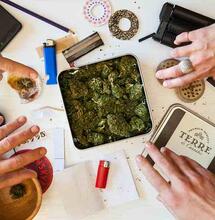
The paper bag method means that you should have some nicely dried bud, but the process does not stop there. You will need to open or ‘burp' the jars to let out any excess moisture that has built up. Otherwise, condensation can occur and moisture can build up, which can lead to mould developing. There would be nothing more heartbreaking then pulling out a jar that had been curing nicely for a few months, only to find that that your delicious harvest is covered in mould!
The jars should be ‘burped' every other day, simply open the jar for around ten minutes and gently stir the buds around. This allows the stale air and moisture out. The burping process should continue for around four to five weeks, after which the buds can literally be left for years.
If you do pull out a fine vintage and find it has gone too dry, you can add a little moisture by putting a fan leaf or a piece of orange or potato peel into the jar.
Happy curing!
S
Soft Secrets