10 Ways To Get The Most Of Your Plants
.
When growing cannabis there are many variables involved that a grower must follow. Depending on how well versed that grower is can determine the final product, from tasting like harsh damp weed that makes you lose breath every toke, or a fine cured crispy greasy nug that tastes as good as it looks. Here are 10 tips and things to consider when understanding all of the elements in the equation of growing high grade cannabis buds.
 I spent time in Spain where I came across some very low grade genetics, where the grower was none the wiser and it appeared the sellers of the seeds were the same. One thing that I always consider and especially if you come from a cloning culture, invest well in genetics and be prepared to break the bank and cash out on some heavyweight seeds. Try and spend around £50 or €60 euro on a 5 pack as for sure these will be keepers and ones you will hopefully enjoy as flowers and in clone form for a long time to come. The internet is a great way to buy seeds if you are not of the old school nature of everything cash, however it is best from my experience to walk into a seed shop and see which seed banks offer what and what advise the seed shops can give you. Researching online is recommended but beware of all of the internet forums who can seriously grow things out of proportion regarding strains so try and stick with reliable sources like Leafy and E.U Seed Finder and Soft Secrets.

 • Metal Halide bulbs produce a strong white light which has been in growing for a long time. These types of lights are used to light up car parks, highways and motorways and football stadiums. Growers who have used these prefer them over H.P.S as they produce a greater spectrum. The advantages and disadvantages of metal halide is these bulbs cost more than H.P.S bulbs as each takes longer to make due to the design of the halide bulb. Also these require a ballast and can create a great deal of wasted heat energy within the grow room.
• L.E.D. have really taken the lighting world by storm and now produce lighting which meets P.A.R and the plant wavelength with clinical precision. By creating the ideal wavelength, the plant responds with faster growth and short internodal spacing. These lights are expensive but the investment is well worth it if you have a few extra grand to throw around. The penetration on the well established L.E.D lights is brilliant and lights can be kept at the very top of the grow tent with very little heat output. No ballasts are required with these light and the option to select how many clusters you want on at a time is possible.

Genetics:
This has to be the start point and the genetics you are growing are the difference between bronze and gold. When starting from seed or with a clone, working with well established genetics that has real industry hype behind it can start you off half way to producing terpene rich thick budded plants. Unfortunately with such an overwhelming development in the seed world has created opportunities for cheaper low grade genetics to flood the market. Of course if you take a trip to Amsterdam, then you can find the industry established seed banks with cup winning strains like Sensi Seeds, Royal Queen Seeds, Paradise Seeds, and many more who rely heavily on keeping up to date with the latest crosses and cup winning genetics. I spent time in Spain where I came across some very low grade genetics, where the grower was none the wiser and it appeared the sellers of the seeds were the same. One thing that I always consider and especially if you come from a cloning culture, invest well in genetics and be prepared to break the bank and cash out on some heavyweight seeds. Try and spend around £50 or €60 euro on a 5 pack as for sure these will be keepers and ones you will hopefully enjoy as flowers and in clone form for a long time to come. The internet is a great way to buy seeds if you are not of the old school nature of everything cash, however it is best from my experience to walk into a seed shop and see which seed banks offer what and what advise the seed shops can give you. Researching online is recommended but beware of all of the internet forums who can seriously grow things out of proportion regarding strains so try and stick with reliable sources like Leafy and E.U Seed Finder and Soft Secrets.
Root Development:
Undeveloped roots are the main cause for any grower who is underperforming yield wise, growing with a H.I.D set up and is feeding nutrients and has good genetics. The roots are so often neglected as the main focus is on what the grower can see above the medium. The are lots of old sayings such as ‘ Small roots mean small fruits ‘ and ‘ Big roots equals big shoots ‘. There are many growers out there who run with a short vegging time of around 3 weeks and some who flower their plants even shorter than that. This can be due to logistical reasons and the best way to perform of growing a very large quantity of small plants in a sea of green set up. However, it could just be as a beginner grower you have always grown according to the nutrient feeding chart and allowed a 21 day period of root development. Upon reflection what can be grown by the roots in this time is debatable. Roots can grow very well if the roots are air pruned and there are certain nutrients and hormones that can be added at the correct times. When a cannabis plant is triggered to flower with 12 hours of darkness, it will primarily focus the growth from that point on growing new flower sets, new leaves and shall slow down on root development. By this stage the cannabis plant you are growing will be well established with a sturdy tough root base, so the roots and plants can work together and produce food for the plant to grow and flower. It is very important to start checking your root zone as often as you check the new growing shoots and leaves, whilst checking to see closely how fast the roots are growing, how fluffy they have become and how white they grow. This will give you an indication of the various types of roots that growing within the root zone. These roots will consist of a tap root, elongated taproots, fibrous roots, tuberous roots and branch roots. The main nutrient that roots require very early on is the same nutrient plants require in flowering to produce thick branched heavy flower sets, which is Phosphorus ( P )Nutrients:
Feeding a plant is one way of increasing final size, potency, flavour, aroma and overall bag appeal. I have done many experiments where feeding with just tap water and worm hummus and coco, produced some excellent results with buds toppling over from weight. That being said there are so many ways that an overzealous grower can over feed their plants and quickly cause nutrient lock out or deficiencies beginning to show at a quick rate. When growing with organics and the most natural way to grow, there is a 72 hour period where the medium acts as a buffering zone. This is what allows a grower to grow with ease and not make any mistakes that cannot be fixed with a flush or top up of another nutrient. One mistake that growers make is feeding chemical nutrients into an organic buffer zone which has developed an ideal P.H and buffering zone. Especially in flowering, plants can be over fed the wrong nutrients at the wrong times, thinking the extra weight will benefit them in the end. Below is a list of a very safe organic mix that will ensure feeding with plain water or a molasses will deliver an excellent final product.Organic Base Mix:
• 30% Co co • 40% Perlite • 30% Worm Casting • Bat Guano • Diahydro ( Diatomaceous Earth high in calcium and silicone ) • Microbe Pack ( Trichoderma )
Carbon Dioxide:
Plants require carbon dioxide, water and light in order to photosynthesize, producers sugars and in response grow unaided or without hand fed nutrients that is. If you are growing plants that are performing very well then with increasing the amount of available carbon dioxide that the plants can use, will in return speed up the exchange rate of CO2 used and will absorb more nutrients, respond better to light uptake and metabolism. Cannabis plants that have been fed high levels of carbon dioxide produce heavier final yields than gardens without carbon dioxide. To explain this in an easier way, if you are growing with a 1000w grow lamp and you are feeding the adequate nutrients, the plants like a person when walking require certain levels of oxygen available in PPM ( Parts Per Million ) When oxygens levels are lowered, the human body must respond and energy levels , awareness and focus will all take a back seat until there is more oxygen for the blood stream and body to perform again. The same principle occurs with plants and considering the relationship the human and plants have is hand in hand, supplying the plants with carbon rich air is very beneficial.Lighting:
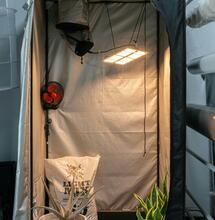
For sure the biggest factor when growing cannabis and the final weight can be down to how much light the plants were receiving. Not only how much light the plants have been receiving, you must understand the difference between lumens and photo active radiation ( P.A.R ). The different types of lighting used when growing cannabis will range from basic household fluorescents, H.I.D lighting and advanced L.E.D lights • C.F.L or compact fluorescent are not classed as intense lighting but are ideal for small plants, rooting clones and the vegging stage. Used to veg plants can allow for soft healthy vibrant plants indeed, however when flowered a light from the list below should really be incorporated. The advantages and disadvantages of using C.F.L is that they are cheap, easy to find, produce very low heat, use very little electric, produce the blue spectrum of 6400k and the red spectrum is 2700K. Lights can be kept close to the tops of plants and even touch the bulbs without any serious tissue burn. • H.P.S stands for high pressure sodium and is classed as H.I.D lighting. This means it requires an electrical discharge to run which the ballast and produce a ‘ high intensity discharge ‘ to emit light from the bulb. These are the commercially most popular and used by growers as they are easy to set up and produce a good number of lumens. The advantages and disadvantages of using a H.P.S is that these lights require a ballast and can get extremely hot indeed. The heat that is given off is not only waste heat but the penetration of the bulbs is significantly lower when raised 36 inches above the plant tops. You will need a 600w light in order to promote serious sized buds and 400w will just not produce anything substantial at all. • Metal Halide bulbs produce a strong white light which has been in growing for a long time. These types of lights are used to light up car parks, highways and motorways and football stadiums. Growers who have used these prefer them over H.P.S as they produce a greater spectrum. The advantages and disadvantages of metal halide is these bulbs cost more than H.P.S bulbs as each takes longer to make due to the design of the halide bulb. Also these require a ballast and can create a great deal of wasted heat energy within the grow room.
• L.E.D. have really taken the lighting world by storm and now produce lighting which meets P.A.R and the plant wavelength with clinical precision. By creating the ideal wavelength, the plant responds with faster growth and short internodal spacing. These lights are expensive but the investment is well worth it if you have a few extra grand to throw around. The penetration on the well established L.E.D lights is brilliant and lights can be kept at the very top of the grow tent with very little heat output. No ballasts are required with these light and the option to select how many clusters you want on at a time is possible.
Vegging Time:
The time a plant takes to grow from seedling until the plant is given 12 hours of darkness is called the vegging time. Also called the growing period, this is the point where you will grow your cannabis plants into small seedlings then into large bushy plants big and strong enough to take clones off. If you are vegging plants that feel weak and have hollow stems when attempting to take a viable clone, then this plant needs more time to toughen up and become thick and hard wood. Vegging plants for around 56 days or more with relevant training can really enhance the toughness and durability of a cannabis plant. Considering that you will be flowering your seed or clone for around the same amount of time it is good to get in a mindset of flowering mature plants. Plants that have been flowered when the seedlings are still considered soft wood will perform well yet could perform so much better in terms of overall yield if given a month more of training and time to thicken up. For big plants veg them for a longer time and when flowered take the extra time to allow the buds to finish if the plants are very productive and yield large flower sets.Growing Techniques:
There are no two ways about it really that growing techniques incorporated at the right times, with the right genetics can be the difference between one ounce of dry buds to three or four. There are a number of different growing techniques that can be utilised and for a beginner grower the ones that may seem more friendly towards their skill level is topping and pinching shoots and the F.I.M technique. More advanced growers who have experience with a certain strain or style of growing cannabis will use L.S.T and also a screen to perform a scrog. There are also techniques called H.S.T ( High Stress Technique ) which involve physically twisting and breaking stems to form new support growth around the stem, as well as induce hormones and growth auxins inside of the plant. This is called super cropping and is advised to do late on in the growth stage. The best way to really get the most out of a cannabis plant is to train the plants through a screen and allow the entire screen to be filled with hard wood shoots. Personally I do not like to top or pinch out plants and prefer the plant to grow at a faster rate through the screen. This way the entire canopy can fill out evenly and all of the shoots that will be removed will only be around the bottom third of the plant. This technique is excellent for those with a small plant count or limited space.Feeding Regimes:
Following a grow chart form a nutrient company can be seen as a simple yet effective guide, to giving the plants the nutrients they need throughout the entire lifecycle of the plant. Knowing when your plants need feeding despite what the grow chart says is the best way to get the most out of your plant. Not all cannabis plants are the same and some heavy indicas can take a heavy feeding, whilst some sativa strains can be more sensitive to nutrients. A good practice is to wait for the plants to be totally drawn of water then when you see the leaves are beginning to wilt, you will know the amount of time and water that the plant needs before showing signs of wanting watering. Adding nutrients to water is how plants access the nutrients especially if they are not readily available in the required quantities the plants needs at the time. When there is more of a nutrient inside the plant than there is outside, then the plant will have issues and struggle to absorb more of the nutrient until it has used what was already available. Ensuring you have a balance of available nutrients inside the plant and available nutrients outside of the plant is key to plant osmosis and stopping nutrient lock ups.
2 really simple ways to determine if the plants need feeding are:
• Place finger down the side of the pot and feel the length of your finger down. If the top 3 inches seems dry then this is a good indication the lowest parts of the root zone need watering. • Weigh the plant pot using both hands when the medium is totally dry and see how light the entire pot is when it has no water in. Every time you can lift the pots up like this, feed until their is drip through.Humidity Levels:
Being conscious of the humidity levels in your grow room is essential to not only replicating the outdoor seasonal environment,yet ensuring their are no danger zones you are creating mould or fungus wise. • Humidity levels during the early seedling and late vegetative stage should remain at 70% humidity and temperature of 24 degrees celsius. If cannabis plants do not receive high levels of water vapour with in the air, they can grow dry and look tired. • Humidity levels during the flowering stage should remain at 30% and temperatures of 22-24 degrees celsius. If the humidity is above 30% here, this can allow powdery mildew and mould spores to grow and attach themselves to the leaves and buds of the plants. • Humidity levels when drying buds should be 50% humidity and a temperature of 20 degrees celsius. A gentle breeze should circulate the room but never directly at the buds. The buds should take around 7-10 days to correctly dry with a clear audible snap to the twigs.Flushing
This is the final part of the flowering cycle and the indication in 7 days or so the plants will be chopped and trimmed. There is a great deal of confusion regarding flushing and there are many organic growers who will stop feeding and flush for the last week or ten days. When feeding with organics the pressures to flush the plants thoroughly is not as great or necessary as that of a hydroponics grower. The advantages of feeding all the way until the day of harvest can be the grower feels they have pushed the plants as much as possible even until the last day. Also ensuring the last stage of bud swelling, trichome production, terpene development and biomass has the best chance at this late stage. The disadvantage to this is the plants can actually take longer to dry out as the plant is still heavy with salt residue within the nutrient solution. It is the salt residue that creates an unpleasant harsh taste on the throat when smoking a dry flower. The best way to flush even if with organics is to use only plain water and gradually starve the plant of nutrients and water. If you are feeding organics then simply use plain water for the last 7 days and gradually increase the amount of water down. I like to personally keep the medium totally dry for the last 48 hours and this helps when the buds are drying they seem to dry a bit quicker than the buds fed heavy nutrients until harvest. By Stoney Tark Photos courtesy of Dinafem
S
Soft Secrets
