Testing the varieties
As a consumer you might have some experience with strains like Gorilla Glue and OG Kush. If not, it’s easy enough to look at their stats and read some reviews before purchasing for consumption, or you can buy grams of each and compare the medicines yourself.
It’s a little different when choosing varieties to grow. I live in an area with many dispensaries that sell clones. They have a huge selection of varieties, between 25 and 125 cm in each shop. So there are about 75 varieties to choose from. When choosing new varieties to grow either for personal use or distribution some questions come to mind: What is the variety’s branching formation? How much does it grow after forcing? How long does it take until ripening? Which varieties do best under the methods you use? Comparative yields. These are some of the questions that are answered by conducting a plant trial. I am testing a template design of a model for testing. With the proliferation of hybrids and varieties, plant trials are essential for growers to determine what they plan to grow. Trials can be used: • To choose the best progeny from propagated seeds. • To test the effect of new cultivation practices on the varieties being grown. • To choose the best plant to clone from purchased seeds. • To test different cultivation practices. • To test different fertilizers and fertilizer regimens. This model is designed to minimize time, labor, energy and space, making it feasible for ordinary gardeners, small and large, to run a relatively extensive test, fairly easily. The idea is to grow miniature plants by forcing them to flower at an early stage, so they grow miniatures of plants flowered when they are larger.
The Design
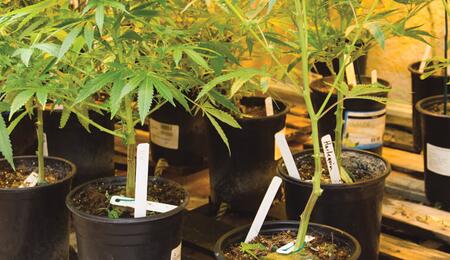
The experiment was conducted in 1.5 x 1.5 meter garden tent. It had a vertical hanging OG metal halide 860-watt lamp in a sophisticated air-cooled reflector that was timer controlled. The air-cooled lighting prevented heat from getting into the garden. Still, excess heat was controlled using a small recirculating air conditioner (AC) installed in the sidewall that sat on a table outside the tent. The air was enriched with CO2 using a 9 kg. tank regulated by a sensor set to keep the space at 1200 PPM during the lit hours. A small oscillating fan kept the air in the space circulating continuously. A recording thermometer, that shows the high and low temperature, was hung from the tubing at canopy level. The temperature was set never to go below 15.50C. The plants were planted in 2-litre, 15 cm containers, each filled with a mixture of 50% coir, and about 25% homemade aged compost (derived from plant leaf, fruit drop and food waste) and used planting mix from previous projects. I used a wick system but you should use your favorite method of planting, whether in coir, planting mix, hydroponic or whatever. [caption id="attachment_4868" align="alignnone" width="500"] Plants were placed in their new containers keeping the stem at the same depth it was in the starter cube.[/caption]
Procedure For Getting the Garden Going
• Label each plant using a plastic marker that is placed in the container and an additional identifying tag attached to the stem. Mark them with a soft pencil. Many inks fade. • Place the plants in the containers. The stem should not be placed deeper than it already is. If need be, use a skewer or other means of supporting the stem upright. • Water after potting with diluted vegetative stage fertilizer water (400 ppm). This is one of the few times you will do this. Instead, in the future the plants will draw water/nutrient solution up the nylon wick, as they need it. • Set the light on continuously for a week. Then turn it off for a day to spur the plants to transition from growing vegetatively to flowering. • The NEXT DAY turn the light back on, but use a timer so the space receives 12 hours of light and 12 hours of total darkness daily. • Keep this light/dark regimen for the next month. During the dark period the plants require UNINTERRUPTED darkness. Do not open the curtain or door or turn the lights on during the dark period- even for a moment. The only light that can be safely used during the dark period is a green fluorescent, laser or LED. • Add water to the tray as it is used. Instead of using vegetative formula, use a complete hydroponic flowering formula, (whether 1 part or more) such as 7-9-5 at 700 PPM. Add pH’d water as needed. • At the same time you change the flowering cycle change the fertilizer to flowering stage formula I used a complete 3-13-6). Drain the tray and add the new water/nutrient mix. • If there is a heater in the garden make sure it doesn’t blow or radiate directly on the plants. • During the lit period the ideal leaf temperature is about 850. Use a surface temperature thermometer to check leaf temperature. Then adjust the AC and heater to keep the leaf temperature between 26.50 C and 29.50 C. During the dark period the ideal temperature is about 240 C. It should not fall below 15.50 C. Use a gas or an electric heater if needed.
The plants were moved into a small greenhouse five weeks into flowering because they were outgrowing their quarters. The move doubled the canopy size to 1.3’ x 2.6 yards. They filled that space too, but they had stopped growing larger and were concentrating their energy on flowering, that is, growing flowers. The greenhouse received light only from the top and the front. The other sides are building walls. To supplement the natural light 2 1000-Watt HPS lamps switch on from 10AM to 4PM. One is on a light mover and the other is attached to the back wall to light the darker back part of the greenhouse. Since the plants were close to one another, the sides of the plants and the understory leaves and branches didn’t get much light. Since light powers both the plant’s growth and its metabolism, these parts didn’t contribute to the plant’s growth. Instead they used energy produced at the canopy to fuel their metabolism, and they hindered the free flow of air between the plants. They were removed. This helped the plants by easing crowding, facilitating airflow and lessening the energy load non-productive parts used. This was a winter garden and it was before the Spring Equinox (March 22) so the plants received fewer than 12 hours of light. The garden harvest began on March 25th just 6 weeks after the plants were placed into flowering. All of the ripened within a two-week period. Once they were cut some of the fan leaves were removed and the plants were hung to dry in a cool room. Usually the room stays between 18-210 C. , but it has been cool and the room temperature has dipped below 170 C., which slows drying. It was also cloudy and rainy, keeping the average relative humidity around 65%. 50% is ideal for drying and curing. After two weeks the plants were slightly moist, very pliable and not ready to take the next step in their journey, manicuring.
To speed things up I plugged in a dehumidifier heated the room as it removed moisture. The plants had a number of different shapes in life, and as they were hanging without their fan leaves it was easy to see them. Before removing the buds I photographed each plant for future reference. The buds were manicured, then weighed and tested for cannabinoid content. This gave us a profile of their shapes, what they look like and their relative yield. Having this information will help farmers plan their gardens or fields- How far apart to space the plants and how to prune them for bigger yields. After drying and curing the plants were manicured and weighed. The results were not impressive, a result of low total light level during flowering and harvest. Last month the winter garden was still hanging, taking a long time between drying and curing. Now they are all properly dried, hanging out in glass jars. • The buds were tested using a unique tool, the QuantaCann2, which uses infrared light to determine percentages of cannabinoids. It’s very accurate and takes little time, under sixty seconds per test. Unfortunately it doesn’t test for terpenes or flavinoids.
Here’s how the varieties tested in THC order:
Comments
The THC levels were not high. The main reason is that the plants were receiving only a moderate amount of light during flowering. The total hours of light averaged only about 10.5 hours daily. The winter and early spring sunlight received was weak and mostly indirect. This was supplemented with 6 hours of HPS light, still too little to produce maximum bud development and to reach THC potential. The differences in THC levels show the relative THC/CBD potentials of the varieties. Notice how many varieties placed in the 16% to 14% range. Except for specialty varieties, all had virtually no CBD.
The Wick System and Experimental Set-Up Explained
A double-ended 1 cm braided nylon wick extends from either end of the opposite facing holes at the bottom of the container. It trails into the tray below. The ends of the wick are stopped from fraying using twist-ties. In this unit the 35 containers sit on a wooden pallet placed inside a 1.2 x 1.2 meter tray filled with rainwater treated with a one-part complete hydroponic vegetative formula (7-9-5 with potassium silicate) to raise it to 700 PPM from less than 30 PPM. Then the pH was lowered to 6. The water was circulated tray using 2 small water pumps that flowed at a total rate of 1135 liters per hour (lph)). It was aerated using four air-stones that were powered by a small aquarium pump. An aquarium heater rated for 150 liters kept the water at 210 C minimum. The tray sat on a piece of 1.3 cm thick Styrofoam that created a barrier between the tray and the cold cement floor. Text: Ed Rosenthal
S
Soft Secrets