Pineapple Kush

Pineapple Kush from Royal Queen Seeds is a hybrid of the varieties Pineapple and OG Kush. Especially the second variety here is a legendary concept in the world of growers, and is renowned for its distinctive aroma and perfect appearance. Today we’re going to turn the spotlight on the union of OG Kush and Pineapple, and have an entirely practical look at it.
To obtain this grow report, we used:
• 16 feminised Pineapple Kush seeds from Royal Queen Seeds; • A HOMEbox Evolution cultivation box of 1.2 metres; • The cultivation system growSYSTEM AIR-POT, ?1.2 metres; • An Adjust-A-Wing Defender Reflector, medium; • A Lumatek 600W control gear with power regulation; • A GIB Lighting Growth Spectre MH 600W lamp for growth; • A GIB Lighting Flower Spectre XTreme Output HPS 600W for flowering; • Advanced Hydroponic of Holland fertiliser, along with additives from the same brand; • A mixture of coco coir enriched with trichoderma and perlite in a 1:1 ratio (48 litres in total); • An Avair membrane humidifier (an old 7-litre model which is possibly no longer in production); • Fans and air-conditioning from a DIY shop. After we had set up the growing space there was nothing stopping us from starting to grow.
We tried to choose a set-up that requires minimal maintenance and allows absences of several days. At the same time, we paid attention to the most efficient use of electricity and fertiliser. This set-up is definitely not the cheapest, but it is worth it – it will keep on working for several years. The only things that we had to buy were fertiliser and cultivation substrate. In addition, we were able to try out different sorts of substrate, including soil.
We had tried using the Air-Pot flowerpot in the past and had been very satisfied with it. After the harvest there are always a lot of healthy roots. This is because the substrate in those flowerpots is evenly moist and at the same time dries out evenly. This proves that the roots get plenty of moisture and oxygen. Another advantage of Air-Pots is that you don’t have to calculate the moisture levels in the growing medium just by the weight of the pot, but also visually or using a stick which you gently poke into any part of the flowerpot. But I’m getting ahead of myself unnecessarily. Let’s go back to the very beginning of the cultivation of Pineapple Kush.
Germination and Planting
We left the seeds to soak in clean water at room temperature. After 24 hours some of the seeds had already split. We poked them into prepared peat tablets, which have proven very successful for hardening off seedlings. Peat tablets are much more suitable for cultivation in soil or coco coir substrate than rockwool cubes, which are often used. Not only do they mix well with the substrate, but in addition peat contains nutrients from which the seedlings can take up energy even before you start to add fertiliser.
You can sow seeds directly into peat tablet without having to soak them first. But the method we used speeds up germination and minimises the risk of failure. It’s better not to leave anything to chance as you will spend maybe EUR 70-80 on seeds. You can see on the photos that the seeds grew good roots and the seedlings happily grew towards the light. As soon as the seedlings have been prepared in this way, you need to transplant them into the prepared system as soon as possible.
After Transplanting into the System
You should transplant the seedlings into the system when the roots are beginning to grow through the peat tablet, as they will then continue to grow steadily. That was what happened for us as well. We then used halogen bulbs, hung at about 1.2 metres above the plants, to give light to the flowers. After about three days we tried lowering them, as by then we could already see how the plants were taking root, growing and getting stronger.
When cultivating under artificial light it is a good idea to put planted seeds under the lamp straight away, directly after they have been planted into peat tablets or rockwool cubes. This way they will be used to the intensive light of the bulbs from the beginning, and in addition they won’t grow long, thin stems.
You can see on the picture of the cuttings that even our seedlings could have gone under the lamp a day or two earlier, even though we sowed them on time, which is proved by the fact that we didn’t need to support the seedlings in any way, as they didn’t fall over or break. At that time the temperature varied between 20.1 and 27 °C and humidity between 50 and 88%, EC (electrical conductivity) was 0.7 and pH 6.3-6.4.
We gave a half-measure of fertiliser to the seedlings and kept the humidity high using a humidifier. When the humidifier ran out of water, the humidity gradually fell to 50% as mentioned. If you can’t check on your plants at last twice a day and fill up the humidifier with water, the risk of running out of water is quite high. Especially during the early days, a more frequent check on the water in the reservoir will pay off.
Growth Phases
We watered the plants manually for twelve days, so we could be sure that they were getting as much water as they needed. Later we set up the automatic irrigation so that it watered them for five minutes three times a day. We have a drip irrigation system, meaning that just enough nutrient fluid will drip in five minutes. In addition, a combination of coco coir, perlite and Air-Pots meant that the fluid drained back into the reservoir, so more intensive irrigation was possible, though not as intensive as it would have been with ex-clay.
It is simply necessary to sort out the watering for each system independently and with regard to current conditions. In our growroom we were able to maintain high humidity, meaning that the substrate dries out more slowly and the plants can absorb moisture from the air too. We left the plants in the growth phase for two weeks.
Three weeks and two days passed from the sowing of the seeds. When growing from seeds you should reckon with at least one extra week compared to growing from clones. During the growth phase the temperature was maintained in the range of 18-28.7 °C, humidity varied between 30-87% but fell to the minimum value only exceptionally. We gradually raised the EC from 0.74 to 1.56 and tried to maintain pH at 6.4, but it constantly jumped to up to 7.14, so we were having to constantly correct it.
Just before switching to the flower phase the EC climbed to 2.01. This was due to the fact that we delayed switching to the flower phase and we didn’t want to carry out the concurrent flushing until just before the flower phase. The longer you use nutrient fluid in a circulating irrigation system, the more the EC value rises. Flushing with clean water and enzymes was carried out during the transition to the flower phase, as we planned.
First Flower Phase
As already stated, we started the flower phase by flushing. Usually it’s enough to flush for one or two days, but with regard to the as yet small plant size and high EC value, we chose a longer flushing period, for five whole days. The EC of the fluid flowing out of the flower pots increased, which was proof that the plants still had sufficient nutrients. After five days we began to add fertiliser to the plants for the flower phase. The growth was even and healthy and all components worked without difficulties.
The humidifier was still running at full throttle. Many growers think that humidifying the air should be carried out during the growth phase only – this isn’t true. The plants love atmospheric humidity and high relative humidity will accelerate their growth. So it’s a good idea to humidify the air until the risk of mildew arises, and that is during the last three to four weeks before the harvest, depending on the size of the plants and flowers. In the first flower phase nothing major happened and all the values were maintained at the desired levels: temperature 18.7-29.1, humidity 45-87, EC 0.5-2.23. The lowest values were recorded during flushing. PH varied between 5.77 and 6.76 but we tried to keep it below 6.
Second Flower Phase
During the transition to the second flower phase we increased the doses of fertiliser and tried to maintain the EC value at between 1.8 and 2.4. Big strong plants with a well-developed root system are easily capable of absorbing a lot of nutrients. When increasing fertiliser applications to the recommended level, it is of course necessary to remember to flush regularly with clean water and enzymes.
We did this regularly each week and the whole of the last week before harvesting. In the last week we added the product Final Solution. It should be mentioned that during the whole time we avoided major problems like pests or diseases. During the cultivation we had to use an anti-pest preparation, for thrips, only once. However, we intervened so very quickly that the plants were not damaged in any way.
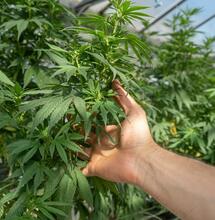
From the pictures you can see that we used supportive plant netting during cultivation. It helped us to organise the growth of the flowers and to make use of the lamps in the best possible way. The sea of green method is similar, but the plants get much more tangled up in the netting. The last flower phase was marked by a drop in temperature due to lower temperatures outdoors.
Concretely this was 17.8-27.6 and when we had calculated the average of all the days we established that the average temperature during the second flower phase was 25.83 °C, whereas it had been 26.78 during the first phase, so it was almost one degree less. This may seem insignificant, but it’s an appreciable difference for the plants. EC varied between 0.35-2.88, where the lowest values applied to the flushing, while the highest were reduced straight away. Atmospheric humidity varied between 43-87. We had no issues with mildew, which can undoubtedly be attributed to adequate ventilation – the air-conditioning ran non-stop.
Conclusion
Pineapple Kush is a pleasant variety with an intense scent. The plants grow evenly and quickly and form even branches. We could easily have removed more of the lower branches, or used the plants for the sea of green method mentioned above. Even so, Pineapple Kush is suitable for low-maintenance cultivation and I think that even a beginner could achieve excellent results with it.
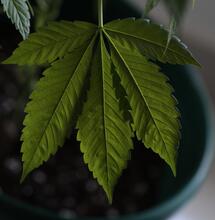
Look at the pictures and see that anyone would be satisfied – medium-sized plants with even branches and compact flowers. After switching to the flower phase, you should be able to harvest in around seven to eight weeks. Personally I like this type of variety, because it’s easy to work with and the result is definitely worth it.
S
Soft Secrets