Making Seeds at Home – Part Two
26 Sep 2018

Step Four: Store pollen.
Store small amounts of pollen in aluminum foil, enclosed with silicon to absorb excess moisture so that it does not destroy the pollen. Pollen has a short shelf life in nature. High temperatures and moisture destroy it. Pollen can be stored in the freezer for several months. Store pollen in an airtight container along with silicon pellets to absorb any moisture in the container. Periodically remove silicon to dry and then be returned to the container. Make sure to let container sit at room temperature for several hours to avoid moisture condensation from temperature change. Carefully remove pollen from the collection bag and pass it through a screen to remove flower remnants. Remember, dead flowers and foliage attract moisture and will contaminate and spoil pollen. Place wax paper under the screen to catch pollen. Pour pollen into a sterile test tube or small container from a craft store. Scrape remaining pollen into tube or container with a sterile instrument. Seal test container. Put test tube in a larger airtight container with several packets of silicon to absorb moisture. Seal pollen with silica gel and leave at room temperature so the silica draws moisture from pollen before putting it in the freezer. At pollination time, pull pollen out of freezer and let it warm up to room temperature. Do not open the container when cold or water will condense inside and kill the pollen. Keep refrigerator at low humidity. Thawing and refreezing pollen will diminish its viability. [caption id="attachment_8576" align="alignnone" width="800"] Grains of male pollen such as the one in the photo (magnified 4,000 times) stick to the stigma, develop a tube through the style, and release 2 gametes—1 to fertilize the ovule and 1 to fertilize the endosperm.[/caption]
Step Five: Pollinate female.
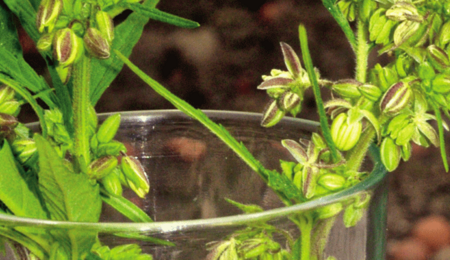
Flowering females grow many ready, receptive stigmas until pollination occurs. Best pollination takes place about 3 to 5 weeks after females show their first flowers. At this point the majority of receptive stigmas are ready for pollination. This is when a few of the stigmas start to curl and slightly discolor, signifying the onset of senescence. Receptive stigmas are turgid and most often are white or off-white in color. Senescing and dying stigmas that are brownish are not viable. [caption id="attachment_8574" align="alignnone" width="800"] Male flowers can be stored for a few days in a glass of water, but they have a tendency to open prematurely.[/caption]
Not all pollinations are successful. If in doubt, you may want to pollinate 2 or 3 times to ensure your success.
Once pollinated, the majority of the female’s energy is directed toward seed production, and bud formation stops. Pollinate well-formed buds packed with well-formed stigmas to produce the maximum number of viable seeds.
Home breeders need to pollinate a flower bud full of stigmas or a single branch full of buds to make more seeds than they need. Humboldtlocal calls pollinating one branch “planned parenthood.” The unpollinated branches are sinsemilla. The sinsemilla tops are harvested when ripe. Seeded branches continue to mature
for another week or two until ripe.
A little bit of pollen on your thumb or finger is the best way to pollinate specific sets of stigmas in a flower bud. Human skin is oily and it holds pollen well without altering it. Brush pollen-laden thumb or finger lightly to disseminate countless grains of pollen to fertilize females. Be very careful with remaining pollen on finger. Rinse fingers in water to remove pollen, or quickly lick pollen with your tongue.
[caption id="attachment_8572" align="alignnone" width="800"]
 Cannabis is very promiscuous! Michael demonstrates a special bag with a window to prevent pollination. Paper bags are good indoors and in greenhouses; waterproof plastic may be necessary outdoors.[/caption]
Label everything. It is easy to lose track of names. Cross-reference notes or codes on plants with copious notes in a notebook. Color-code pollinated females with small pieces of yarn for easy identification. Some breeders use barcodes to track plants. The barcode is fixed onto the plant tag and attached to the plant.
Put a little pollen into a plastic bag. Carefully cover a single female branch packed with receptive ripe stigmas with the bag. Tie the end of the bag around the stem of the branch to ensure that no pollen escapes. Shake the branch lightly for complete dispersal of pollen to all stigmas. Leave the bag for 2 days and nights to ensure thorough pollination. Move the target plants to a “safe” area to avoid accidental pollination of other plants. Be careful not to scatter pollen when removing the bag.
[caption id="attachment_8575" align="alignnone" width="800"]
 A single lower branch of this big female is fertilized with male pollen. The seeds are left to mature for about 2 weeks after flower buds have been harvested.[/caption]
[caption id="attachment_8573" align="alignnone" width="800"]
 A little dab of pollen is all that is necessary to selectively pollinate a few stigmas.[/caption]
Avoid using an artist’s paintbrush to pollinate individual buds. Pollen is very fine; a paintbrush tends to hold too much pollen, and it is difficult to contain. Pollen can easily disperse beyond the targeted stigmas.
[caption id="attachment_8571" align="alignnone" width="800"]
 Set a group of females in an enclosed area. Set a single male plant a few feet from an oscillating circulation fan. Turn on the fan to help disperse pollen in the room to pollinate all the females.[/caption]
Some commercial breeders and seed makers place multiple males or clones of the same male in the seed production garden room with their breeding females. Males release pollen in the well-vented room, allowing complete pollination of the crop.
Wash clothes and shower afterward to avoid transporting pollen to nearby plants away from the breeding zone. Spray pollinated females with water a couple of times before returning them to the normal “sinsemilla” grow-room population.
Clean seed room thoroughly after each seed crop to avoid accidental pollination of future crops.


