How to prepare a feeding container

To build a feeding container for your plants, simply fill a container with water and install a water pump inside. Start the pump and add the nutrients. Then, depending on acidity level, adjust the pH, and irrigate the plants immediately afterwards. This procedure takes time and you may wish to speed it up, right? But usually more haste means less speed. Why is it desirable to spend more time and pay more attention? In this article, Soft Secrets explains why.
Do it yourself
Try the following:
Fill a container with water, add a heating element (20 degrees) and leave it uncovered for 24 hours, after which, put a water pump into the container and turn it on. Add fertiliser A and stir for 5 minutes, then add the same quantity of fertiliser B and stir again for 5 minutes. Next, pour the additives and mix again for 5 minutes. Before irrigating, the water pH needs to be adjusted. After doing so, stir again the solution for 10 minutes. Let it rest in the container for 20 minutes, check the pH value once more and adjust it again, if necessary. Mix again for the last 5 minutes. You now have a nutrient mix that your plants will love!
Why is it a good idea to leave the container uncovered for 24 hours?
Usually tap water has no chlorine. However, chlorine is often applied when urgent repairs are made to the water supply network - e.g. in the event of a leak, or the replacement of an old pipe, or the laying of new pipes under the road surface. Chlorine is added to prevent the spread of Legionella and Escherichia coli bacteria. However, an excess of chlorine is harmful to plants. For this reason, leave the feeding container uncovered for 24 hours after filling it. This way the chlorine evaporates from the water. There is no need to do anything else, evaporation takes place on its own. [caption id="attachment_37546" align="alignleft" width="1040"] Feeding container[/caption] Besides that, water purification companies report that they are often finding it hard to purify water. Increasingly higher concentrations of pesticides, insecticides and chemicals – such as poly- and perfluoroalkyl substances (GenX, PFOS, PFOA) – are detected in groundwater. Obviously, these man-made substances are not naturally found in the environment. The good news is that they also evaporate from heated water after 24 hours.
Is all that mixing really necessary?
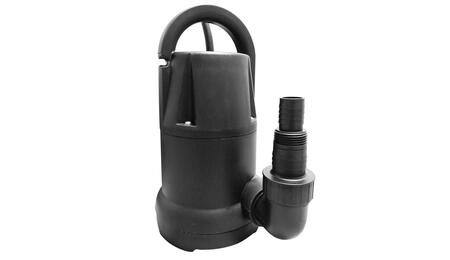
Most growers use two-component fertilisers. They are also commonly called fertiliser A and B. Some growers also use one-component fertilisers. A plant always needs 12 elements (NPK, Ca, Mg, S, Bo, Co, Mn, Fe, Zn and Mo) to grow and bloom optimally. If one of these 12 elements is missing, your plant will sooner or later show defects. A two-component fertiliser (A + B) consists of 12 elements, whereas a one-component fertiliser 10 elements. A one-component fertiliser is often used in soil substrates. These soil substrates (Light Mix, Full Mix, Pro Mix, etc.) often have already been pre-mixed with (powdered) fertilisers, so with the use of a further one-component fertiliser the defects will be absent for longer. Finally, back to the feeding container. The ideal water temperature for adding fertilisers is between 16 and 20°C. This is also the ideal temperature to accurately measure the pH. Turn on the water pump and make sure the pump stands on the bottom and pumps the water upwards. Prepare your A and B fertiliser bottles and a liquid-measuring cup and place your EC meter in the container before dosing the fertilisers to be added. An EC meter with a long cable and an electrode at the end is preferable. Do not opt for a low-cost device. Sooner or later it will float in the water like a buoy. Invest in a good EC meter with or without integrated pH meter instead! [caption id="attachment_37547" align="alignleft" width="546"] pH and EC meter[/caption] Always use the same proportion for the dosage of the A and B fertilisers. If you use 100 ml of fertiliser A, then also use 100 ml of fertiliser B. In this way, the proportions between the fertilisers will remain balanced. Why can't you just add fertiliser A and B together? If fertilisers are added at the same time, some elements will react together. This is one of the reasons why components are split into bottles A and B. In particular, the calcium element does not combine well with e.g. sulphur (sulphate) and phosphorus (phosphate) in high concentrations. These elements precipitate in the feeding container and can hardly be assimilated by plants. However, calcium is an important element for plants, with a major influence on the final yield as well as on dry weight. The reason why you have to stir for exactly 5 minutes before adding a new fertiliser dose is that, by stirring the liquid, a high concentration of fertiliser mixes perfectly with water and no precipitation occurs. The same principle applies to all other additives (bloom stimulators, growth boosters, enzymes, rooting enhancers, etc.). After mixing fertilisers A and B, add all other additives one by one and stir for 5 minutes after each addition. [caption id="attachment_37548" align="alignleft" width="483"] Submersible pump[/caption] When all the prodigious fertilisers and additives been added, then you can adjust the pH value. Tip: If you use an EC meter in the container where you add fertilisers and additives, place its electrode as far away as possible from where these liquids are poured into the water. This avoids high fertiliser concentrations close to the meter, which may damage the electrode.
Adjusting the pH value
Acidity adjustment in the feeding container is generally not so difficult. All you need is a liquid pH adjuster which consists of two bottles (pH-up and pH-down). After mixing all the fertilisers and additives, let the water pump continue pumping and stirring. Take a bottle of pH down or pH up and a good calibrated pH meter with sufficient battery charge. Hang the pH meter on one side of the container and dip its electrode into the water. Then start adding the pH-down or pH-up liquid drop by drop on the other side until the correct pH value is reached. In this case too, place the meter electrode as far away as possible from the side on which the liquid is poured, so as to avoid damaging the device. Even the most expensive models are not resistant. In order to obtain an optimal nutrient mix to feed your plants, measure the pH value again after 20 minutes. Why 20 minutes? All the substances already present in or added to the water, such as fertilisers, additives, pH-up or pH-down liquids and oxygen will react with each other. Chemical bonds still occur after the first pH value measurement, so the pH value can fluctuate. Tip: Calibrate the pH meter you use once a week. Clean the pH electrode after each use by rinsing it with demineralised water. Then blow on the electrode to remove any residue, dip the electrode into a potassium chloride (KCl) solution and place the cover cap back on the electrode. It is ready to be used next time! Your feeding container is now perfectly in place and plants can finally be irrigated.


