Home Growing in Southern England

I'm a grower down on the southern coast of England and I'm painfully aware of how bad the current situation concerning good quality bud has become. You can go in to any city, town or village around here and get a bit of bud without too much hassle, if you know where to look. Some local tokers may be lucky and get decent smoke but pay the high price of £10 ($15.60) per gram, while others may end up with the run-of-the-mill crap that seems to be selling everywhere these days for around £20 - 25 ($31 - 39).
I’m a grower down on the southern coast of England and I’m painfully aware of how bad the current situation concerning good quality bud has become. You can go in to any city, town or village around here and get a bit of bud without too much hassle, if you know where to look. Some local tokers may be lucky and get decent smoke but pay the high price of £10 ($15.60) per gram, while others may end up with the run-of-the-mill crap that seems to be selling everywhere these days for around £20 - 25 ($31 - 39).
I, for one, can't be asked to hunt around trying to find a decent bit of smoke that is going to cost me a small fortune. This is why I grow – not for the potential high value rewards that can be made in this business, but because I love a good bit of bud and I resent having to pay a king’s ransom for it. I have been growing for about seven years now and only recently have I decided that something needs to change, be it the (stupid) law or the dealers standing up and saying NO to crap bud! So this column is my contribution to help enlighten and educate like-minded people about how important it is to know what you are doing when producing a garden of beautiful Cannabis plants. We can all stick a seed in a pot and let it grow; however, as most people who are passionate about growing find out, this is barely even the tip of the peak you need to scale if you want truly awesome weed. My intention with this article is to help people to grow good Cannabis, easily, so that they no longer have to buy from a questionable source or some multitasking street dealer! I am going to start nice and easy with a grow report on the lovely Super Skunk from Nirvana seeds, for which I have a particular fondness, plus it is a strain that just seems to love me back! (You will know what I mean when you try it). I have been growing it for several years as I find it still cannot be beaten for quality or quantity when compared to your ‘standard’ and even most ‘high grade’ bud that you will buy from your next-door neighbor’s teenage son’s friend – you get the picture! It gives me great pleasure to share this grow with you all, as I have just moved grow rooms from a cramped space to somewhere my ladies can properly flourish! On top of that, I have ditched the two ‘old faithful’ 600-watt HPS lights, (although these will re-appear at some later date as they are such good lights), and have opted for a mixture of 300-watt LED bloom lighting, 150-watt HPS with electronic ballasts and 250-watt CFL lights, to save a bit of energy consumption. One thing I am keeping the same is the method of growing, since I have a strong preference for the Wilma ten-pot hydroponic drip system from Atami.Lighting
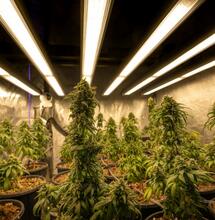
I will begin the lighting with the 150-watt HPS with electronic ballasts, two of which I purchased from a grow shop on the outskirts of town for £300 ($467)! I know that this sounds like a lot, and it is really (this simply highlights the differences in costs that growers around the world must face), but using two of them is supposed to be the equivalent of a 600-watt. For this reason alone they have to be worth a try. High-pressure sodium is a great light to grow under; two 150-watt lamps equal a 300-watt, which equals less electricity consumption, and as a last point of interest, they run a lot cooler than a 600-watt and come with a mirrored diffuser for better spread of lumens over your leaf canopy. These will be used in the flowering period.Growth Medium
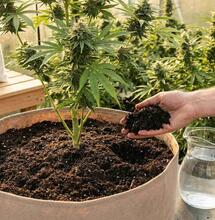
There are many different media on the market, from countless reputable dealers, that are great for all types of growing methods or applications. These come with or without added nutrients and other goodies, such as trichoderma or worm castings. I have always used expanded clay pellets (LECCA), small rounded balls that come in fifty-pound bags. I find these cheap and easy to use as they retain little water, compared to media such as cocos. This is good for me as I like to leave my pumps on twenty-four hours a day to allow my plants access to as much feed water as they want.Nutrients
Again, nutrition is an area in which there is so much variety that it is hard to say which product or brand is the best or worst to use, and I guess the nutrients are only as good as you are, at the end of the day. I have used House and Garden nutrients for five years on my beloved Super Skunk plants, and they seem to adore it – much more than the B.A.C. Topflower I used to use. They (House and Garden) have a good range of products over here, ranging from root enzymes to veg and bloom pH adjusters, right through to bloom stimulators and flushing solution. The Wilma ten-pot hydro system is a re-circulating system, and House and Garden produce a great set of nutrients for this type of system called Aqua Flakes, one of the new ranges of feeds that are supposed to be ‘pH-perfect’, meaning that there should be no fluctuations in your pH values once set to your desired level. In this system it is between 5.8 and 6.1.The Grow
With the basic setup covered, it’s time to get down to the bit that we all care most about: growing our lovely bud! After my twenty clones had rooted and were split into two batches (ten for the 300-watt LED for another grow, and ten for the 150-watt HPS for the plants discussed in this article), I set my ten ladies into their new home for the next two to three weeks so that they could establish a healthy root system and bulk up a little bit more, before they get moved to the flowering room later. To help them along they were placed under a bank of four-by-five (foot) 35-watt fluorescent fittings, which give off little or no heat and allow the plants to grow right up to the lamps and absorb all that yummy light goodness. Some people will think I’m a bit mad to use only bloom nutrients throughout my plants’ lives, but I have never found this has stunted or affected my veg or bloom at all. The ladies started their cycle on a mild solution of feed water at around 1.0 EC for a week, and then I started raising it at the start of week two. EC finished at 1.4 by the end of the third week of veg. Usually, at this time my plants are around the twelve- to eighteen-inch mark and are showing off a nice sturdy main stem and plenty of branching, with deep green leaves wanting more light.Flowering
The plants have had a great start and are all looking healthy and uniform in growth, so now is the time to move them into the all-important flowering room. I love this room, it being where the magic happens. To see a load of cuttings come through and finish, coated in resin and stinking to high heaven, is just wondrous. Frankly, I could lose myself in there all day, looking at the glistening flowers plumping up all around me. As I’m using the Wilma ten-pot, moving the plants around is really quite easy as I can remove the drippers, pick the pot up and move it into another ten-pot system inside the flowering room. Once the plants have adapted to the new environment the feeding schedule begins again. We start with a 1.4 EC under a 150-watt HPS lamp, with an electronic ballast for supposed better use of energy. The lights are slightly smaller than a 250-watt, but are extremely bright and give off very little heat close to the lamp. The light is placed about sixteen inches above the plants for the first four days to give the plants a chance to adapt to the sudden jump in light intensity, and then moved down to ten inches from the canopy by the tenth day. As with all HPS lighting, the plants picked up a bit of vigor and had a little growth spurt for a week or two, which pushed them to a height of around twenty-four to thirty-two inches. Feed was raised to 1.6 EC at this point, as the plants were starting to react to the change in photoperiod (light regimen from 18/6 to 12/12) and I was already seeing white pistils start to emerge from each flower – growth looks impressive and well-formed considering, it is only getting light from a 150-watt! Over the next two weeks the EC level was raised to around 1.8 and things were looking good for the Super Skunks under the 150 watts. The buds were starting to form defined nuggets and the plant was looking as healthy as she possibly could. This is when I cracked open the House and Garden Shooting Powder, worth its weight in gold. This little treasure gives the plants a mighty phosphorous boost for three weeks (starting at week five of flowering, up to week eight, before flushing for a week for good measure at the end), and it has a massive effect on the size, smell and taste of your harvest. Every time I use this, it amazes me. You can literally see the buds fatten up every time you are in the room. I’ve had flowers that have doubled in size after using this stuff, yet they always stayed tight and dense. By the start of week six I was beginning to feel a little bit anxious. I looked at my garden and instead of seeing the fat, luscious buds in front of me that I’m used to seeing, I had smaller-than-usual buds that looked a little bit airy, apparently lacking something. I checked my temperatures, which stayed around 22 - 24° C (71.6 - 75.2° F) constantly, the nutrient solution and the humidity, and they all are perfectly acceptable. Could it be the lights? I know that I’ve only got a 150-watt over these, but if the hype was correct I should have my usual fat, glistening buds by now. Instead I have four plants in the middle that are looking okay but not brilliant, and six plants on the edges that just need more light than they are getting. This is a pain, as it means that the plants are not using the nutrient as efficiently as they could be, because the lack of light intensity means photosynthesis happens at a much slower rate! Unfortunately, come harvest time the buds hadn’t swelled much more and the overall dried yield was only a fraction of what I’ve achieved with the same setup (excluding the lights). But, judging by the ever-present stench of the Super Skunk, she didn’t seem to care that she didn’t get as much light as she had wanted, as she still stank to high heaven. Plus, the taste was just as good, so all was not lost.Conclusion
These 150-watt lights are a good alternative to running a 250-watt, but in no way compare to the mighty 600s. I would recommend using them for veg lights or as a flowering light for the first three to four weeks, then raise the wattage to a minimum of 400-watts for the remaining time. Unfortunately, they just don’t deliver the goods to flower a decent crop of tight buds from start to finish As new grow shops and previously-unheard-of lights, filters and other equipment are constantly popping up across the globe, further experimentation must be accomplished before any concrete opinions are formed. I shall continue my quest to source my own ganja and avoid shelling out to the local dealers. Happy growing and smoking, fellow stoners across the pond!
S
Soft Secrets


