8 Top Tips for Growing the Best Outdoor Crop in 2025
Springtime is upon us, and as an outdoor grower, there are many rules to follow to ensure that you achieve the ultimate cannabis harvests outdoors. It takes lots of hard work and daily maintenance to ensure you succeed as an outdoor cultivator, so in this article, I provide 8 top tips for you to follow to get you on the right track.
1. Decide the Best Strain for Your Climate
The first place to start is to decide which strain will be best suited and most practical for your climate. In Northern Europe, the weather can be hit or miss, so ensuring that you work with the best genetics for your circumstances will pay off massively once your plants start flowering.
My tip here is that if you live in the U.K. or Holland, it is best to choose a strain that is reliable, resilient to cold and harsh climates, and can withstand the inconsistent weather that European growers face. Check the seed bank strain descriptions to learn about the strains they offer and which ones have a strong reputation for being weather resistant and well-suited for colder climates.
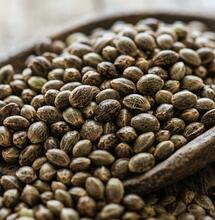
2. Feminized Seeds Are Easy to Work With
If you are new to growing cannabis outdoors, you can choose between regular sexed seeds that produce male or female plants or feminized seeds. The difference is that using feminized seeds does not require you to worry about removing male plants once they start to reveal pre-flowers, and it also allows you to maximise your outdoor growing space.
Another superb selling point for feminized cannabis seeds is that you can grow several different strains at once, and can rest assured that all of the plants will produce buds. Not only does this mean you will be able to harvest many different strains within the same time frame and have your jars full of delicious flavours, aromas, and effects, but you will also learn how each strain grows and reacts to its environment. Make sure you clearly label each strain to avoid confusion and be as organised and professional as possible.
3. Start Your Seedlings Off Indoors
Because Spring can still bring cold nighttime temperatures and potential rainfall in Northern Europe, starting seedlings indoors is an excellent way to guarantee the best start. My favourite method is to germinate cannabis seeds under a fluorescent or low-powered LED and let them grow healthy and strong roots.
Starting your seeds indoors for the first 2-3 weeks will allow you to keep your plants away from cold and wet weather and avoid insects or birds that can cause your plants stress or potentially kill them while they are still young and vulnerable to the outdoors.
If you do not have a grow light, simply place the seeds behind a sunny window and make sure they get the warmth and direct light they need to establish their first set of leaves and develop into small and strong plants with 3-4 internodes before placing them outside for the rest of the season.
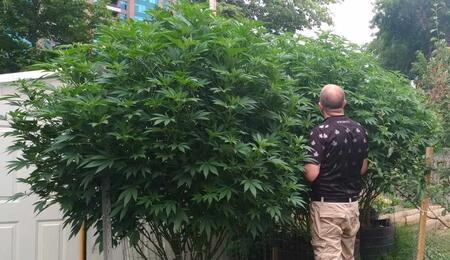
4. Give Your Plants Plenty of Direct Sunlight
Once you are confident that your seedlings are healthy, robust, and ready to be placed outside, allocate a sunny and warm place for them. South-facing is always best, as this will ensure you get the maximum hours of sunlight each day. If you can, avoid leaving them in a shaded area, as the temperatures can become cold and uncomfortable for the plants, affecting root growth.
Placing the seeds high up in an outdoor environment, such as the top of a garage or shed, can help give them the extra few hours of direct sunlight each evening. Just be careful that your neighbours cannot see the plants if you plan to do so, and find an area that provides a stable temperature, adequate sunlight, and shelter from harsh weather, according to R.Q.S.
5. Create a Good Watering Schedule
Watering cannabis plants plays a massive role in root development, nutrient uptake and availability, and how fast and big your plants will become. Underwatered cannabis plants will have a thin and weak leaf structure, can become stunted, and grow very slowly. Overwatering your plants can cause them to wilt and make the growing medium wet, heavy, and oversaturated, eliminating the much-needed oxygen that the roots require to grow.
My tip here is to constantly water lightly around the edge of the pot, use warm water, and lift your pots to determine how light or heavy they have become before watering them again. Another great way to create the most consistent and reliable watering schedule is to water them early in the morning and then again as the sun sets. Avoid watering them during the hottest parts of the day, between 12 pm - 4 pm, and always lightly water until you see a small amount of runoff at the base of the pots. For growers who can not always attend their plants, why not try an outdoor automated watering system?
6. Pick the Right Growing Medium to Use
Selecting the best growing medium for cannabis plants is as important as picking the right strain. When deciding which growing medium to use, you should consider aeration, drainage, and nutrient availability. I always prefer to make my own custom soil mix, so I will use a mixture of soil, compost, coco coir, and worm hummus with worm hummus added in. You should want the growing medium to feel spongy, airy, and not compacted together.
The reason is that the roots have lots of oxygen and fresh air around them when growing, promoting optimal root growth. As far as nutrients are concerned, there will be a high amount available for the plants to consume as they develop from the seedling stage into the vegetation stage, where they will focus on growing stems and leaves and becoming bushy and robust. Avoid buying the cheapest possible soil from garden centres and check online to see which nutrient companies offer the best types of growing medium designed for cannabis.
7. Grow Autoflowering Genetics Outside
Suppose you do not fancy the idea of planting a photoperiod cannabis plant outside and waiting until the end of July for it to start flowering. Why not give auto-flowering genetics a try? Autos are known for flowering automatically, so after the 4th week of growth, you can see pre-flowers starting to form, followed by beautiful glistening buds for the next 7-10 weeks, depending on the auto-flowering variety.
The best thing about growing autos is that they are not dependent on light cycles. They can be planted from April until the latter part of the year and only take three months to be ready to harvest.
As advised by M.S.N.L, the perfect temperature for auto flowers is 18°C to 28°C during the day and slightly cooler at night.. Try to avoid extreme heat or cold, as it can stress the plants. Autos are tough and resilient plants, ideal for growers in Northern Europe. They will produce medium-sized plants that are easy to keep discreet and allow you to create a perpetual harvest throughout the year. This means you can plant autoflowering seeds every three months and get three harvests per year instead of waiting until the end of September / mid-October before you can chop.
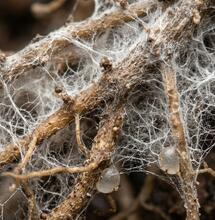
8. Frequently Check Your Plants for Insect Damage
Inects will want to land on your plants, damage them, and even lay eggs whenever possible. Making sure that your crops are insect-free is easier said than done, so my tip here is to check the leaves on a daily basis, carefully inspecting the tops and undersides for insect damage and signs of eggs.
The worst insects you can get are spider mites, thrips, and caterpillars, as these can cause a lot of damage to your plants, causing them stress, and caterpillars, if not dealt with properly, will eat their way through your buds. You can buy predators to fight off insects naturally and help protect your plants over the seasons. The best solution for dealing with caterpillars is to use a bacterium called Bacillus thuringiensis, which will poison them once they ingest it.
S
Stoney.Tark